Lcdisk #6
So many design possibilities to extrude with this new Lcdisk. My favorite is the puzzle piece. I was able to show how to use this puzzle disk at one of my demos at the recent IPCA event in Dublin, Ohio. Everyone loved it. I showed this design finished and extruded a black, silver and white design at IPCA. I will share photos of that at the bottom of the blog.

I made the first time an Autism Awareness ribbon design. I plan to try it again and also add a lighter teal. After doing more research I found that light teal was missing from the design. I love this idea and plan to make and donate many of them. ..
Here is a free mini tutorial for you. If you have the disk on the way you can get started preparing the clay. Enjoy....

Tools needed
Lucy Clay LCDisk #6 Puzzle piece
Czextruder ( I used the XXL Czextruder)
Lucy Clay Slicer or Lucy Clay Blade
Ribbon Cookie Cutter
Plastic wrap
Pasta Machine
Texture sheet for the back of the ribbon
Clay:
Premo Pearl
Premo White
Premo Blue Pearl
Premo Pomegranate
Premo Florescent Yellow
( When I make another I would also make a 4th jelly roll of Premo Turquoise because the Ribbon in most photos has a blue and a turquoise)

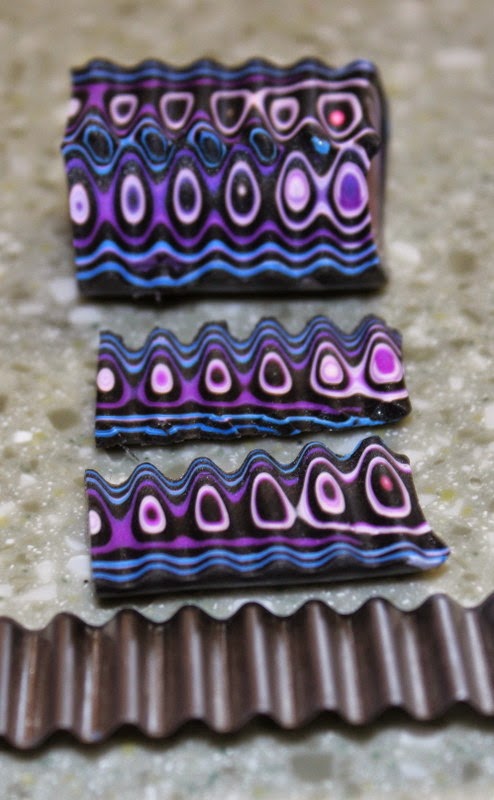
Extrude each color blend Jelly Roll and set aside for at least an hour. If using softer clays put the clay in the fridge for a few hours to let it chill then slice.
I used each premo color and mixed it 1/2 of the color and 1/2 premo pearl. Then made a skinner blend jelly roll with premo white. So I had a nice graduated extruded puzzle piece. It made for a fun design and looks amazing in person.
I then sliced each long extruded cane on my Lucy Clay slicer so that I would have exact level puzzle pieces all the same height which makes a better sheet for a pendant. You could leave it multi thickness for each piece to make it look different. The sky is the limit for this fun shape.
Note when slicing: Be careful when cutting NOT to put the canes too close together as they will stick together and sometimes will not be in the correct order in color placement. I did not get them stuck with this project. But I made a second project and cut them to close and lost a lot of my cane as the little puzzle automatically wanted to fit together when I was not ready.

Puzzle:
YES I put this puzzle together piece by piece.
Note:
It takes a while to connect each little very flexible puzzle piece to the other. I truly found it relaxing and when it came together and looked so pretty I couldn't stop.
Placement:
Once they were all together I laid the large puzzle on layer of Black Premo clay that was rolled out on a 2 on my Atlas pasta machine.
Each row I staggered and started with a different color. I loved the look of it.
This is such a A fun disk design, I am so happy Lucy put in on this disk. I think this will be fun for all.

Put a piece of suran or plastic wrap over the top of the puzzle veneer. You can at this time make it level by burnishing it. I would NOT put it in a pasta machine as it would distort your puzzle pieces. You can burnish with a square acrylic rod or burnishing papers. I like Lucy love to use the square hollow acrylic rods from my shop on Artfire. They work well without putting to much pressure on your project and not distortion.

Lift up the full piece with a LC blade, put a texture sheet of choice under the full piece. Then rub your hand or burnish across the full piece so there is a texture on the back.
Make sure there are no bubbles in the wrap and it is as smooth as you want the piece to be.

Place your cutter where you want it. Be sure to line up your puzzle the way you want the colors to show on your piece. If you want on an angle then angle it. If you want it straight like mine I was sure to make my puzzle piece large enough for the full cutter.

Press down on the plastic wrap and puzzle cutter all the way down to the cutting tile. This way you have a nice rounded edge on your piece. Be sure not to cut your texture sheet below. I had a piece of a soft clay Yo texture under it.

Before lifting the cutter out be sure that everything is smooth on the plastic wrap this will make for a nicer top on your piece.

Remove the cutter, remove the plastic wrap and then using the LC blade lift the full piece up and then remove the ribbon.

Save the outside for earrings you can cut out later.

Here is my almost finished Autism Ribbon

Using a larger tear drop kemper kutter and cut out the center of the ribbon. I should have done this before removing the plastic wrap as it would have left a more finished rounded look like the outside of the ribbon. Note to self. :)

Put a back on your ribbon for a pin or a pendant. If your like me I make everything pin pendants because you get more wear out of every piece of polymer jewelry you make.
Then keep putting puzzle pieces together for more polymer fun.
This is an amazing new Lcdisk. I cant wait to try in more colors. I did a second demo at IPCA in Dublin Ohio.. I was not able to photo the step by step but below are fun finished steps. I will be happy to help anyone that wants tips on making the other design.

Support Autism Awareness as I do.

To donate to Autism Awareness:

To Pre order this amazing disk stop by my link
It sold out the run.. It truly has so much possibilities for creative extruder designs.


My project Demo from IPCA in Dublin. It's a little wonky but before I realized it I had my friend Jan Bake it so I could travel. Oops. Note to self check for wonkiness before baking ;).

I used the same method as above. Instead of bright colors I made black to white skinner blend jelly roll and a silver to white skinner blend jelly roll.

Extrude the jelly roll canes with my xxl czextruder and the new #6 lcdisk in the puzzle shape.
Sliced the puzzle canes with my Lucy clay chrome slicer.
Placed each little puzzle piece together then placed them on a black base that was rolled out on a #2 thickness of Premo black clay.
Used a Ying Yang cookie cutter and first cut out the puzzle piece of the yen and black clay for the Yang. The other piece I used scrap from the outside and put it on one part of a Yin.
Just a cute little design that would be fun in many colors.
Thank you to the amazing artists and clay friends that sat or stood and watched me I think it was a few hours to put the puzzle together. I had so much fun chatting with all of you. Made my demo so much more relaxing and informal.

For more inspiration...
and
For an exciting challenge with the LCDisk #6..

To find out more view the link below:
For a few other fun polymer extrusion Ideas for this new disk.
Visit Lucy's amazing blog.
I love her puzzle project.

There is so much LCDisk inspiration on Lucy's blog be sure to view her blog and her Facebook page for daily inspiration:
Thank you for your support and love

CREATE WITH COLOR, LOVE, AND BLING