Rose Hair Stick
These Area A Few Photos of The Finished Ones That Are Available for Purchase
There is more on the bottom of the Tutorial.
This Hair Scarf and Pin is for sale in my shop, if you are interested please click
the top photo and it will take you to the listing.
If you would like me to make you one in a different color.
Please click the photo below to take you to the link for the custom Scarf Pins.
I will happily create one for you, I have many colors to choose from.
****Please note this tutorial is for the Rose Stick ONLY
If your interested in learning how to make a scarf base you can buy
Jill Kollmann's Tutorial Below.
She does not have the steps to make the flower one but gives you wonderful
instructions on how to create a base & Pin.
If you want me to make a tutorial Please comment below.
If I get enough requests I will make one.
It will be next month before I can get to that project.
My inspiration was my clay bestie Valerie.
She has purchased I believe 5 of my scarf pin & base sets.
Photos below of the finished ones.
She was curious on how to make the stick
So I did a short tutorial for her so that she can create one for herself.
Then I decided to share it with all of you as well.
I hope you have fun with it and if you have any questions please Email me
Press the Contact me button to email me
I found a wonderful tutorial for a Pony Tail Scarf Pin Holder Artisan Jill Kollman on Etsy.
I got alot of amazing tips from her using it but I wanted to change it to make it my own of course.
I have NOT included any of her instructions or photos in my tutorial.
My design is different in every way and my technique is different.
I do Thank Jill for teaching me alot of technique's that I will use in the future.
I love all of Jill's tutorials. She is an amazing artist & teacher.
Now lets get to work
Supplies:
Wooden Dowel ~ or extra support (you do not have to) 6mm-8mm in diameter
Hack Saw or small saw blade to cut the dowel
Sand Paper of any type
Ruler to Measure your Dowel to your choice of size 5.5 to 8"
Liquid Sculpey Clay or Sculpey Bake & Bond
Premo Clay ~ I used # 5035 Bright Green Pearl
Resin (optional)
Glaze (optional)
1 ~ 8-10mm Swarovski Cystal, Pearl or Bead of choice
Polymer Clay Petal Cane
Blade
Pro Kemper tool
Wire Cutters
Eye Pin
Paint Brush (optional for glaze & resin)
Acrylic Roller
Step 1 : Prepare your clay, Condition your clay well to get out the air bubbles.
Roll out 1/4 of your package of clay on a thin setting on mine I used a 3. (1 is the thickest on my pasta machine)
You don't want it so thin that it will tear but you also don't want it too thick or it will bubble up while baking.
Roll out your piece approx 1 inch wide and 7 inches long. Trim the edges evenly with your blade.
Step 2: Prepare the Hair Stick.
Cut your wooden dowel to 4.5 to 5 Inches.
Your stick will be approximately 6 inches including the rose on the end.
You may cut your dowel shorter if you have shorter hair or do not want the end of the stick to show alot.
Sand the ends of the dowel One end flat the other end pointed as shown in Photo 1 & 2.
The end on the left is flat, the end on the right has a point.
Step 3 : Using either Liquid clay or Sculpey Bake and Bond cover the stick.
I like to give it a good coat then put gloves on
Once I have it coated on all sides I rub the liquid clay all over the stick
Try not to miss a spot. It does not have to be thick.
A nice thin layer works great
You just need enough on there so that the clay bakes to the wood well.
*If you put too much and do not smooth it out it will create bubbles.
Step 4: Lay the dowel on the clay.
Trim off some clay if there is alot of excess. Don't trip off too much.
You just want to have a nice small piece of clay so you can easily roll the dowel onto the clay.
Step 5: Roll the dowel on the clay
You will see uneven parts, with your blade cut the clay
before you wrap the whole thing so that the edge is straight.
Step 6: Once the clay is even on the dowel
Roll your dowel until the clay meets
Press down slightly to make a indentation
Unroll the clay easily. You do not want to tear your clay.
Step 7: Where the clay met cut the clay there.
If you have a few short areas Like I did in my photo that is ok
Once you roll the clay it will all even out.
* Unless it is a huge area do not add extra clay or you will get air bubbles in your clay during baking.
Step 8: Roll and roll and roll and roll your clay stick.
Roll until its smooth to where there are no indents, no air bubbles.
You want your stick perfectly shaped.
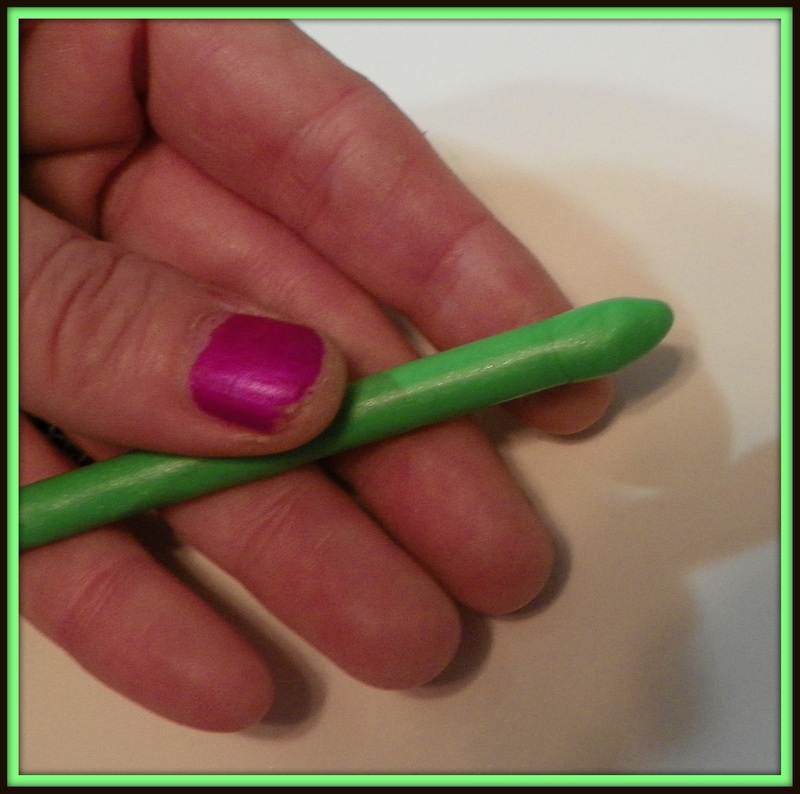
Step 9: The clay end you left pointed
You will have excess clay, Trim it off. Leave just enough to cover the end.
Lightly cover the end with your fingers. Pressing firmly but not mushing it too hard.
Firm but delicate pressure. Hard to explain sorry.
Roll that end between your thumb and pointer finger is a good way to put it.
You can make it as pointy as you want.
* If your going to use it to put through a sweater make it more pointy than I did.
It does not have to have a sharp point to go through hair.
Step 10: Flatten the opposite end with your pointer finger
If there is alot of excess clay trim it off and save the clay for the next step.
Step 11 : With your excess Clay Form a tiny cone
Were going to add this to the flat end of the Stick
This is what we will attach the stone to and part of the petals to make the rose shape
I made my cone approximately a 12mm ball size then shaped it into the rounded triangle (cone)
Step 12: Attach the cone to the flat end of the stick and smooth it nicely.
You do not have to roll it. You want it a little thick because it is the inside of the rose form.
Step 13: Now to prepare your flower petal cane of choice.
My slices are between 2 & 3 mm. You don't want them too thin because they will be to fragile for your hair.
You may make them as thick as you like. Its your rose make the petals the way you like.
I took my pro kemper tool and where there were lines in my petal
I made small indention's just to give it a little more detail (optional) .
A better tool for this would Be CForiginals larger tool it makes nice clean grooves
without cutting into the clay.
I would slice about 16-18 rose petals. You can cut as many or as little as you want.
If you want your rose thicker with lots of layers cut more petals.
You cant go wrong with petals.
This photo is me using CForiginals tool to make indention's in the clay petals.
Step 14: Choose your center stone. I recommend at least a 8mm - 10mm crystal.
You will only need a small eye pin. I like using the ones with a round ball at the bottom (optional)
**Make sure when you choose your center bead that it is glass. If it is not bakeable your project will be ruined.
Put your stone of choice on your eye pin.
Step 15 : Cut your wire about 1/2 inch long
Step 16 ~ Photo 16 & 17 : Put a dab of bake and bond on the sharp point of the pin or glue before inserting in the clay
Insert the cut end of the wire into the center of your triangle you made on your stick
This will be your base for your Rose
If the wire shows under the stone, take the stone out and re-trim it to fit.
You want your stone to look like this.
Do not cover the stone with clay. You want it left open.
Step 17~ Photos 18 & 19: Starting your rose shape.
Place one petal on the green clay cone
You do not have to press the petal down super hard to make it stick to the clay.
Press them lightly just so they stick in case you want to move one slightly one way or another.
You do not want to cover up the stone in the center
But you do not want the stone sticking out way above the petals
Well I shouldn't say that if you want your stone to stick out higher than the petals that is (optional and personal preference)
Lay one petal partially overlapping the other petal keeping them uniform around the center.
It usually takes 4 petals to cover the stone. If you use less than that it will look like a closed up rosebud.
So overlap them and don't be afraid to add 5 if you really want the center to open
Shortly you will shape the petals and Open them up a little the way you like.
Step 18: Start your second layer of petals
You want to drop down about just a little bit less than 1/4 of an inch
Place your petal to where it is overlapping two petals above it. As shown in the photo.
This way it will look like a real rose. Petals always overlap. They are never in the same spot.
Keep adding petals all the way around, This row may take 5-6 petals to cover the whole base of the stick.
See this is how your two layers of petals should look.
Step 19: Time to add your Third layer of petals,
Follow the same pattern as the last layer.
Be sure to overlap and put each petal between two petals above it.
You can see how they overlap in this photo.
Step 20: Now you have your three finished rows of Petals.
You may add another layer of petals if you want (optional)
Step 21: This is where I like to shape my Rose.
If you want to slightly bend a petal back so that it looks more open and all of them look different
No rose petal is alike.
Take your thumb and pointer finger lightly hold onto the tip of the petal
LIGHTLY squeeze and then bend the petal outwards giving it a bit thinner look at the end of the petal.
You can make each petal a bit different when forming it with your fingers.
* remember to only do the very tip, do not use alot of the petal you will break it
or it will split or come off. You want to just bend enough to give some shape.
Step 22: Now to make your sculpted leaves
(optional) You can use leaf canes instead if you have one you like
I like to make my own, gives it alot of definition and unique.
Roll 2 balls of clay into about a 16mm ball
Flatten onto your Tile or workspace into a pear shape.
Make sure there are no cracks you want a smooth pear shape on front and back.
1) Put a line with your pro kemper tool or your favorite tool down the center of the pear shape
2) At an angel shown in the photo Put lines starting at the tip.
I like to press down towards the center and lay the tool down to give a nice deep impression in the clay then lift the tool.
3) Put lines on all three leaves.
* you can make more leaves and add more layers (optional)
**just remember you need at least 4.5 inches of stick to go through most hair types.
4) So measure your stick before you place your Leaves on
Step 23: I like to pinch both ends of the pear shapes to give the leaf a pretty real looking leaf effect.
Your finished leaves
Step 24 : Now we add the leaves.
I put them almost directly under the last layer.
I put them on a curves slant to give it a natural look as show in the photo.
I go around and overlap the leaves slightly but not much.
Just enough to cover the bottom of the clay petals.
Finished Rose Bud
Step 25: After working with the stick alot I like to roll it one last time.
I don't want to mess up my rose bud so I take a flat surface and put it on my lap.
Or you could hang it over the edge of a table. Just be sure that the flower tip doesn't hit anything.
Roll the stick so that all the fingerprints and all air bubbles or dents are nice and flat.
You may need to reshape the pointed end again after doing this.
That is ok. Shape it the way you like and it will bake up nicely.
Step 26: Optional: Before baking lightly add a coat of Liquid clay with a paint brush
Or resin. I use resin, I have my own mixture I use.
I like to add Resin because I like my hair accessories sturdy.
You do not have to add anything.
Step 27: To bake I make an accordion out of paper.
Take an index card long ways and bend it back and forth like a fan when you were a kid.
Lay your rose stick in one of the slots and make sure it does not touch anything.
I like to lay mine on top of my bead rack or you can use a few cookie cutters.
You just want to make sure that the rose head is not touching anything so it does not get crushed.
Bake at the temp that the clay your using recommends.
Tips: once baked if you have a crack in your stick, take it out of the oven right away.
Run it under ice cold water. The whole time massaging the area that is cracked together
Push the cracked sides together and keep massaging until it sticks back together.
this usually works wonderful. I have never gotten a crack in one of the sticks once I started using the
Liquid clay or bake and bond. But just in case that is how to fix that.
Tip: If there is an air bubble. Do the exact same thing. Take it out while it is hot or as soon as you see it
The sooner you catch it even if its not baked all the way.
Take it out and rub that bubble as hard as you possible can to get it to re attach to the wood.
Tip : If it doesn't re-attach? I have tried two things that were successful.
1) let it dry overnight. Dry and then Wet sand the area to smooth it out.
Then Buff with a piece of Blue Jeans.
2) ** if this does not work. I have cut the bubble off with my blade
put a small amount of bake and bond in the wooden area.
put the same thickness of clay in that area. Try very hard not to overlap the clay at all
Roll the clay just like you did the first time. Cut off any excess that overlaps.
Bake again as directed by the clay type you used.
** Keep a close eye on it. if it starts to bubble pull it out and do the cold rubbing method
then finish baking.
Other Scarf pins and Bases that I have made.
The three photos above were created using my very first flower cane I ever made. I thought it turned out pretty .
It sold right away. :)
This is a black and silver hair stick
I can create any color hair stick or scarf pin that you would like. Go to these listings and you will see the choices. If you want a different color please email me. I can create something that you like. I'm always up for a challenge.
Here is the listings for the Hair Scarf Pins
If you have any question's about this tutorial or scarf pins or scarf pins & the bases please email me by clicking this link below that says contact me. I will be more than glad to help you in any way I can. Happy Creating. Please share any photos of your Rose Stick Pins. I would be excited to see and would add them to this gallery with a link to your shop.
Any comments or tips welcome. If I get more than 20 requests I will create a tutorial for the base.
Thank you for stopping by I hope you enjoyed the free tutorial,
feel free to share it with others, and send them this way if they
have any questions or suggestions.
As always Blessings & Thank you for supporting me
and Handcrafted Artisans
To find more of my work Please click the links below
Create With Heart, Love, Color and Bling