

CzeXtruder XXL by LUCY CLAY

LUCY CLAY ~ LCDisk for Extruders
#1 LCDisk Magenta

LUCY CLAY ~ Extruder Brush Cleaner

Thank you for stopping by my blog.
Today I am doing a product review, demo and a free tutorial with some Polymer clay tips and technique's for cleaning your extruder. This blog will be a bit long but worth reading. I am truly impressed with these products and enjoyed creating with them and doing this demo.
Lets Begin
What is Lucy Clay and a Czextruder?
The CzeXtruder is made by Lucy Clay a company based in the Czech Republic and they have in production many wonderful clay tools that they will be introducing soon to the world.
I am now the USA distributor of their products.
To purchase items view my:

My first batch of product sold before I could even list it all in my shop. Several demo extruders in the XXL version were sent to artist's around the USA. Soon we will be hearing reviews/demos from them also.
A new box full of wonderful tools is going to be on its way in a few days. So there is a lot more coming for the artists in the USA and I am honored and very pleased to be able to make them available to you with the cooperation of the wonderful family run business Lucy Clay.

Lucy Clay, CzeXtruders, Tools and Accessories are sold in several countries now. To see if your country is one of them view this link.
To view all of their products that are for sale and coming in September to the USA view two sites.
Or

I will be setting up Pre-Orders soon for all of the items shown on the LUCY CLAY SITE.

For a lot of great tips, tutorials and reviews on the Lucy Clay products view their Facebook page
Now for the Review, Demo & Tips

CzeXtruder XXL pink

Great size. Fits a very large length of cane.
The one I used was 6 inches and I could have added more.
I needed the rest for bases in my tutorial.

Any disks will work in the CzeXtruder but I really like the LCDisks from Lucy Clay. They fit perfectly and cover the whole top so that no clay is stuck in cap when done extruding.

The steel end cap fits nicely. Fits perfectly. I un screwed the cap 50 times and put it back on. Not something you need to do. But I thought it was necessary to see how it works after a lot of use. I had my husband tighten it extremely tight over and over and it did not strip the threads like most extruder caps. This is a quality steel and threading on the cap inside and the extruder rod on the outside. Very impressed.

I had made this cane two weeks ago and set it aside. I knew I wanted to use it for this review and I did not want to have fresh clay. I did not want it recently conditioned. It extruded perfectly as if it was just conditioned. Each snake was perfect and strong. It did not break and I was careless with it and all snakes stayed together. I notice with my old extruders that snakes break before you can even use them.

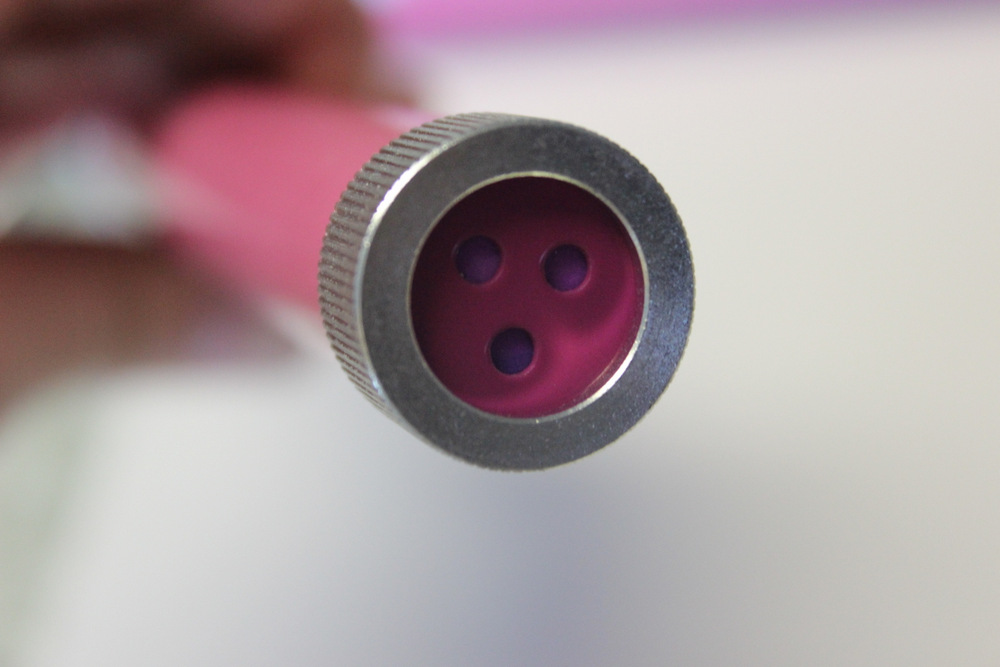
One thing I do really like is that very little clay is left in the extruder. The two little dots were left because I forgot to use my clay knife to cut it off, I broke off the snakes. I like that there is very little wasted clay when you use the CzeXtruder.

You can see in the extruder just a touch of clay left after removing the Lcdisk, also almost nothing in the cap. In other extruders there is usually a ton of clay in the grooves of the cap. The disk itself has barely any clay residue on it.

Removed all the parts and as you can see barely any clay in the steel extruder. I love the thought of no wasted clay.

Unedited photo of what the parts look like immediately after extruding. Very little cleanup. Beautiful extruded snakes of clay.
Demo and Review of Lucy Clay
LCDisk #1 Magenta
Also some tips.....

What is the difference between LCDisks and other disks?
LCDisks are 0,8mm very thick and strong they do NOT bend. They also are strong and sturdy so your extrusion comes out perfect shapes. No distortion at all from a disk that is too thin.
Other disks are 0,2mm to 0,3 mm thick which will bend and warp in time.

Photo of the LCDisk and the cd plastic case that is re-useable to store the disks.

To use the mini disks you bend each little disk back and forth or spin it around and it will come off easily.


Love the plastic disk case. Use your disks and put them right back in their place ready for the next time. Easy to clean the disks with the Lucy Clay Cleaning brush or a baby wipe.


Above is photo of the cleaning brush coming to the USA via Lucy Clay.
I will have them available in my shop this week.
Reserve yours now via my email kimisdesigns@yahoo.com


My Review of CzeXtruder and Lucy Clay products
1. Professional Quality
2. Sturdy and easy to use
3. Easy to clean
4. Easy to use with drill.
5. Converts from handle to drill with ease
6. Every part on the Czextruder holds up to extended use, hours and hours of use and still extrudes clay with ease.
7. You can tell this was designed by someone with a lot of knowledge in engineering. It turns with ease, the parts fit perfectly and its strong and built for any type of use from small projects to large.
8. Easy to use for disabled. Easy to turn either handle.
9. for disabled each part comes off with ease. So you do not have to have someone else do it for you. You can use this tool, you will love this tool and you will be proud of the beautiful creations with this tool.
10. Food safe for cake or cupcake artists. You can extrude frosting, fondant, food of any type (like potatoes or other things that you want to make in shapes). there are silver unpainted disks on the way available for food artists. :).
11. This company strives to make quality, safe, strong products. They experiment with their tools over and over to make sure every part works great for artists. If it doesn't they update it. They strive at quality customer service. I like that. They are here for us.
Free Faux Soutache Tutorial
Tools:
XXL Czextruder
Lucy Clay LCDisk #1 magenta (5 circle disk & 1 circle disk)
~***~
Sculpey Ball Stylist Tool
Sculpey Blade
Sculpey Bake and Bond
~***~
X-acto Knife with a half round tip
~***~
small heart cutter
~***~
Circle cutter approx. size of silver dollar (any shape will be fine)
Supplies:
Pearls or stones of choice.
I used a 14mm 1/2 Swarovski pearl
1 10mm White Swarovski Pearl
2 6mm White Swarovski Pearls
~***~
Pin/Pendant backing
~***~
Premo Purple #5513
Premo Accents Purple Pearl #5031
Sculpey III Fuchsia Pearl #1112
Cane Directions:
(I made a basic bullseye cane with equal 1/4 parts of 2 oz packages of Premo clay) Then conditioned clay and made 8 inch long by 2 in wide of each color on a #1 setting on my Atlas Pasta machine (largest setting).
I sliced the bullseye in half and then rolled It in a circle and then inserted it in the extruder. So you will see half color on the cane inserted in the extruder in the tutorial below.
To find instructions for a bullseye cane view
~~~~****~~~~
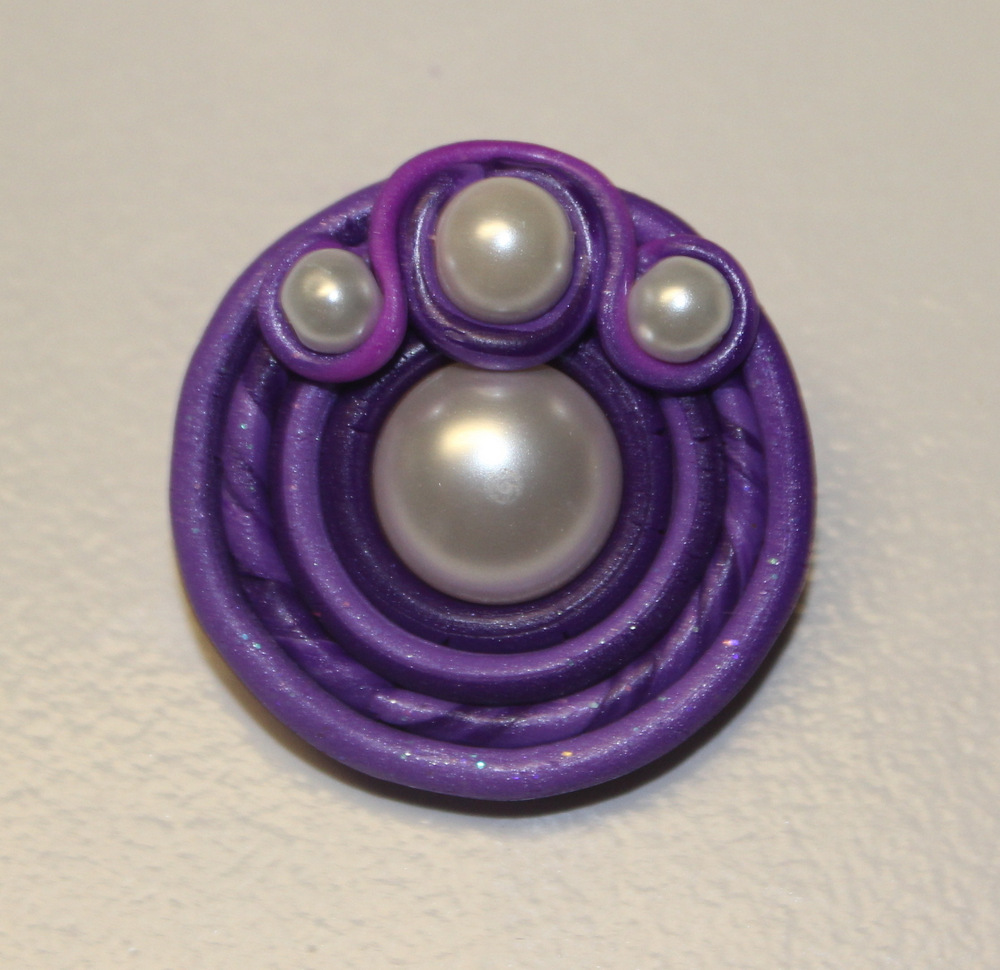
Faux Soutache Pin/Pendant
by Kimberly Idalski


I made a mixed purple clay cane just for fun. Several pretty premo colors of clay.
Using the 3 hole Lcdisk from the Magenta #1 disk.

Extruded snakes for my soutache.


Cut four slices for 4 pin pendants. Made a swirled lentil base and flattened it out.

Using an approx. 1.5 inch round cutter cut the lentil for the base.


Added a 14mm Swarovski half pearl to center

TIP: For all soutache cuts.
Cut at this angle. So that it fits together nicely when you wrap it.


Lets Start Soutache. Lay your first extruded snake that is cut on an an angle. Start at the top and wrap around the whole pearl. You do not need to press down it will stay snug in the clay. If you want to you can add a drop of Sculpey bake and bond under the pearl.

Bring the snake around and cut at that same angle.

My mixed color of clay gave me many swirled colors of clay. Pick a different shade for your second snake. Start at the top again. Wrap around.

Cut at the top. Push lightly with the blade to put the two cut clay pieces together.

Extruder a small section of purple mixed clay with the 11 hole extruder lcdisk from #1 magenta disk from LucyClay.

Twist two smaller snakes together to make a twist.

Roll the snake smooth or leave it twisted. Your choice..


Cut at an angle then wrap in the same way as the other extruded snakes.
Cut at a slant on top and tuck together.

top view of the three snakes

Using another of the 3 hole lcdisk snakes. Pick another color and wrap another circle of clay around the others. This is my last one. I try to cut in the same place and will add a detail to cover any slices.

Top view

Pick some matching pearls or crystals or bicone beads will work too.

Add a drop of Sculpey bake and bond to the 8mm Swarovski pearl. Make sure the holes are on the sides. Not showing on the top. The snakes will be put around the sides and will cover the holes. Press this pearl into the base slightly.

Sclpey Bake and bond of Liquid clay works great to attach the stones or pearls to the clay before baking.

Using a different color in the mix of lots of snakes. I used a tiny end to wrap one wrap around the 8mm pearl. Cutting on a slant like others and patting it together with my finger.


Position your 6mm pearls so that you can get 1-2 thickness of extruded snakes between them and the larger pearl. I used one thickness of snake for this one. Put a dot of sculpey bake and bond and add your pearl. Pressing it lightly into the base clay.

Using the 11 hole extruded clay snake. Start at the 10 o'clock spot on the 6mm pearl with the clay. Wrap around and over the top of the pearl. Lightly it doesn't have to be to tight you want it a little flexible so it covers the holes in side of beads. So go around and up towards the 8mm pearl.

We are now through the between section of the clay. It is ok to overlap clay a bit. In Soutache the ribbons sometimes overlap. Depends on your design. I like it to overlap a bit gives it more definition. Looks pretty with all the colors too. So were going up towards the top of the 8mm pearl and were going to go around and over that pearl. Using the same snake from the 11 hole lcdisk.

Using the same 11 hole thickness snake. Go around the 8mm pearl and down towards the 6oclock on the 6mm pearl. Then were going to wrap up and around the 6mm pearl.

Wrap up and around the 6mm pearl. I tucked in the snake with my Sculpey ball stylist tool.

Making a secure back for a pin pendant or pin. Cut a heart out of approx. 2mm thickness clay.

This is the back of my Soutache and put the heart on the pin back. With a touch of bake and bond under the heart and a touch of bake and bond on the base of the clay to help secure.

To attach nicely use a ball stylist to add dots to connect the clay to the base nicely. Adds a pretty little decoration.
Bake at manufactured directions for your clay. I bake all at 250 degrees for 50-60 minutes covered.

Wear and enjoy your pin or pendant. These were sent to my first 4 artists that bought extruders from me. I hope they enjoy them. I thank you for your support.
CzeXtruders, LCDisks, Lucy Clay Cleaning Brushes will be available in my shop soon this week. So get on the list to buy. The list is long :). Which makes me happy that so many will soon have these amazing tools in the USA. They truly are a quality product. If you want on the list contact me for information on pricing. I have to wait for customs before we can set an exact price. Please understand we have to wait on this but I have an approximate so email me for info and to be added to the list.

