

Before we Start. I want to thank all of you for following my blog. I want to thank my family for allowing me to take as much time as I need to work with clay, travel with clay and learn with clay. This has been an adventure and I truly feel blessed. I want to thank all my friends and customers for all you do, for your kindness and your understanding and patience. I try my best to help all of you in a timely manner. I just want to ask a favor of my customers if your new or some of the older ones that may not know about the videos/pdf files. Take the time to read the tips/techniques on this blog. They may help in the future for problems before they happen.
To all my dear friends, fellow artists and customers. This is NOT a complaint more of a concern as I want everyone happy. I worry about everyone being happy too much. I also want everyone to enjoy, have fun and share what they love. With saying that I love my creating time too and have been doing a lot of creating with my new Lucy Clay tools. I have been wanting to do more, I want to share so many things with all of you. Soon I will be having surgery so lots of time will go into catching up on blogs and tutorials. Which I look forward to as i have lots of fun things to share. The surgery is minor something I will have to have every so many months for the rest of my life. Painful but necessary to carry on and create as I do. So very worth it to me. So these next few weeks many blogs will be posted with free tutorials, tips and more. But to do that I need time. So I need you to help me get more of my time back.
So that is my favor.
Watch my videos, read the instructions I have sent. Please. Please. Please.
Take a few moments and read the pdf file directions BEFORE using the tools and watch my youtube videos that were emailed and the youtube videos I have sent or shared with you on all tools you purchase from me. When you do this BEFORE using the tools you save yourself from damaging the tools and or having issues. Also saving me time and you money having to ship them back to me to fix. I don't want anyone to waste any money or time on mailing things back and forth. I want you all to have fun and learn with your new tools. So lets get started.
If you purchased before I was able to make the instructions please email me at kimisdesigns@yahoo.com and I will email them to you.
Originally Lucy Clay Tools did not have directions. I am working with this wonderful company and all that has changed. Manuals will start coming with all tools. We are all new to this and working hard to bring you the best service and the best tools. So bare with us as we improve together. So many more wonderful exciting things are coming from this company in the future.
When you see this Tips photo below. Please read.

In all types of media tools are different. I know when I received my tools I opened it up and got to work no directions needed. In my mind anyways :). I learned so much with practice, patience and realizing that simple rules with these tools are what works. Do not over tighten anything, hand tighten, DO NOT use any tools on your tools. Unless the directions say so. Just like with anything in life if its stuck or something isn't right. Set it down a minute. Think and look at the directions and or walk away a minute and come back and start again. Don't get a hammer and or a huge wrench :(.. Put the scary tools away. All will be fine that I promise ;). Below I have ideas that work. Simple ways to sort through things that may arise and or may not. I want you to know about them before they do. So you will see the sign Tips with the writing above "Save time and avoid mistakes" on the really important ones.
You will see these below.
Fun things are just marked

Or

This is not a lecture. More a concern and a way to grow together to make these tools work for you and your designs. I want to help you because these tools are made for you. I believe they are the best out there and I have tried them all.
Lucy Clay Tools are engineered professionally. They are built to last and are strong. They also have strong pressure working mechanism inside that is a natural element, air and pressure. So if you don't read the directions you stand a chance of damaging your tool.
If used properly this will be one of the best tools you have ever purchased. I love my Lucy Clay tools and would not trade them. They are made for us and once you learn to work with the tool not against it. You will be amazed how well it works. It so important with any tool to be safe know the tool and with that you will get the best results and will love creating..
Lets get started.........

Links to use your CzeXtruder properly via youtube video are here. If you have one please watch before using. Thank you and most of all have fun.
For the Czextruder with the Crank Handle watch this video : https://www.youtube.com/watch?v=iqLItIsEImA
or for the Czextruder with the T-Handle watch this video: https://www.youtube.com/watch?v=uw9OAJtmTQg
The new Czech Republic Video by Lucy Clay Tools.
*** One important note about this video. One of those do as I say not as I do. Do not dry extrude with your tool. Especially with a drill you can permanently damage your Czextruder, the threads and the cap. Only extrude with well conditioned clay.

Free Tutorial
Bottle of Hope
Heart Cane & More
There are lots of tips and troubleshooting in this tutorial and I think it will help you a lot if you own the tools included.

Tools Needed:
CzeXtruder XL or XXL in Size
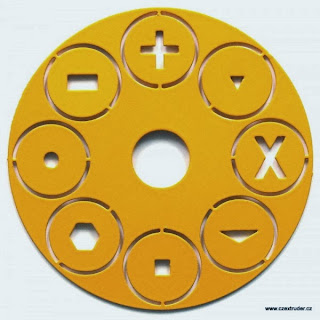
Yellow #3 LCDisk ~ Round
Red #4 LCDisk ~ heart & outside Heart Shape
Drill (optional)
LC Cleaning Brush
LC Blade or LC Slicer
LC Acrylic Roller
Kemper Heart Plunger Cutters all sizes
Largest Round Plunger Kemper Cutter
Pliers
Wire Cutters
Glass bottle (I used a large empty insulin bottle)
Ruler
1 inch square cutter
Ceramic Tile for baking bottle (optional)
Atlas Pasta Machine (for conditioning clay)
Supplies:
Black Premo Clay #
Transparent White Premo #
White Glitter Premo Accents Clay #
White Premo Clay #
Purple Pearl Premo Accents Clay #
Purple Sculpey III Clay #
Lilac Sculpey III Clay #
24ss Swarovski Clear Crystals
24pp Swarovski Clear Crystals
32pp Swarovski Clear Crystals
12pp Swarovski Clear Crystals
Crafters Pick Glue


Photo #1
1) Prepare your CzeXtruder make sure the Plunger is in the main cylinder so you can add clay.
2) Using the heart disk from LCDisk #4 Red Disk
3) Condition 1/4 of 2 oz pkg of each color you would like to use. Then roll each sheet of clay to a #1 largest setting on the Atlas Pasta machine. I picked a variety of purple and more transparent so that when the light shines through the bottle you will see partial purple partially clear.
4) Using the largest Circle Plunger Kemper Kutter cut circles of all colors. Stack the colors the way you would like them to show. I want the outside to be a lighter color. So I started with one circle slice of Light color of Sculpey Lilac, 1circle of Purple Pearl, 1 circle of White Glitter, 2 circles of Transparent, 1 circle of Purple. Repeat. 1 lilac, 1 Purple Pearl, 1 White Glitter, 2 transparent, 1 Purple. Do this 4 times. Then ...Depending how large you want your cane make several stacks. I made 4 full stacks of this series. Set the other aside. I end each stack with the White or the lilac not the dark color.
5) Lightly press the stack of circles with your fingers top to bottom in your hand to mush some air bubble out. Then reduce the cane of circles so that it fits nicely into the CzeXtruder cylinder.
6) put the stack of clay in the CzeXtruder making sure that the Lilac is on the outside. (last to go in the czextruder).
7) Place the Red heart LCDisk on the top of the clay and Czextruder.
8) Put the Czextruder cap on ~ Hand Tighten ONLY!

9) Start Extruding your heart. I used a T-Handle CzeXtruder for this heart cane.

PLEASE STOP!!!


I have been going over this with my customers. How important it is to Stop before you get to the place where the handle hits the cap. BEFORE the Jam Nut goes in the cap. STOP! Also make sure your Jam Nut is tightened at either the Hex bit if using the drill or at the handle using only the wrench provided with your purchase.

If you are extruding and you get to this point and have a lot of clay left to extrude. Your Jam nut and or Hex bit/Handle may not be where it should be. What do I mean????
Before using your tool and adding clay. Work with your tool a bit. Put the white plastic plunger at the very end. Then the cap. Then put the handle in the other end and tighten the cap, put the jam bit on loose but up close to the handle and the handle on all the way.
Then I want you to extrude until the plunger starts coming out. If your jam nut has to go inside the cap to do this then you need to adjust where your jam nut and handle should be. Meaning. Loosen the handle a few cranks. Move the jam nut up towards the handle and tighten it. Then put the white plunger back in. Extrude again see if the plunger comes out without your jam nut going in the cap. Did it work? If it did wonderful. Take a marker or make a scratch in that spot on the threaded shaft so you know that is where to lock your Jam nut every time to get perfect extrusions without ever getting your jam nut locked inside the cap.. Very important because if you get the jam nut locked in there it is NOT easy to get out. It usually has to be sent back to me to fix. So try this it may take a few times but it is worth it.
Will your handle and hex bit be ok not screwed on all the way?? YES. As long as they are on there a couple turns and the Jam nut is locked in place with the wrench provided the handle and the hex bit will not come off until you loosen the jam nut with the wrench provided.
Try this you will be very pleased with the results and find you do not waste any clay :).

Once your CzeXtruder STOPS that means STOP do not continue to push the extruder to extrude more clay. Check the end where the clay is to see if it is at the end. If you have a lot to go there may be air in there so point your extruder towards the ground and continue to extrude. Sometimes this will help push some of the air out to make it extrude easier. If the handle is getting close to the cap start to slow down. You do not want to extrude fast when getting close to the end you are forcing to much air into a small space.
I like to slow down check to see if the cap is super tight. If it is loosen it a little. If the cap will not budge. I extrude until the Czextruder stops. Slice off the clay cane with the LC Blade. Try the cap again. Remove any excess clay from the end. Remove the end cap.
I also recommend when you get to this point turn your handle in reverse a few times. It will release some of the air in the extruder that is built up inside between the plunger and the threaded area. That air has to be released or the caps will be to tight to remove.

TIP: Is the cap tight??? Why is it tight??? Every extruder is made different. Each extruder has its own way of working and once your used to your extruder you will learn to not over extrude and watch for the point that is the STOP point. The Czextruder has the white plunger inside and if you have tried to push it with your finger inside the cylinder you see it is a tight fit. It is made to have good pressure and a good seal inside the chamber. That is why it is easy to extrude clay. It also builds up a lot of air inside behind that plunger when you turn the handle and it somehow has to be released.
1) do NOT use any tools on the Czextruder other than those provided with purchase
2) when your caps seem stuck they are not. They are tight. What to do? Extrude backwards, decompress the main chamber. This may take a few minutes. Extrude backwards check the cap if its loose then take the cap off. If its not then keep extruding backwards. When using a drill you will notice this happens often because it extrudes so fast the extruder takes more time to release the air. So just keep extruding backwards sometimes all the way out. If its still tight then go back and forth extruding both ways and it will un tighten. DO NOT use a wrench on the cap. You can try a glove I recommend. I like these and have had them in my tool kit since I had my other brands of extruders.

They are called an Oil Glove and have an amazing almost sticky grip but they are not sticky. I really help opening anything. Not just tools. I used them for many things in my house because I am wimpy :). I felt terrible a customer mailed her tool back to me and one twist and I took the cap off. I had recommended these and it truly is hard to believe something so simple can work so well but it does.
I finally went and purchased some for customers. I wanted them to be available to you. You don't need two really. Just one. If your right handed and crank the handle with your right hand then you only need a glove for the left hand to hold the extruder. So purchase only the one you want or if you want both then get both. Here is the link to purchase.


Back to the Tutorial. Sorry Trying to really fit in a lot of troubleshooting areas that have been brought to my attention and I want to help as much as possible.

1) Condition About a 2 oz block of Black Premo Clay.
2) Roll it into a log and be sure to get out any air bubbles.
3) Using Disk #4 the Red LCDisk you will need the outside half shape of the heart for this part of the tutorial. We will be making the outside of the heart cane.

4) In the photo above you can see that I moved my white plunger very close to the top of the handle. Because I will need to extrude the full length of the XXL Czextruder of clay for this part. I will need double the amount of what I would use for the inside part of the heart.
5) Why put the plunger up towards the handle? It gives you all the room you need to extrude. Before adding the handle move the cap all the way up towards the handle so you have less extruding to do. Easier to do by spinning the cap up the threaded shaft.
6) Hand tighten the cap and handle. If you are using the Crank handle Lock the Jam nut in place under the handle.

1) Add the full rolled snake of clay to the Czextruder.
2) put the Red half heard on the end where the clay is.
3) hand tighten the cap.
4) Extrude your Half heart. I like to guide it with my spare hand to keep it somewhat straight as you will be extruding a large amount of black to cover both sides of the heart cane. If your clay is well conditioned you will see no cracks as the LCDisks are thick and really hold the shape of your extrusion well. Unlike other disks on the market.

1) If your extruding and your Jam nut is to the point of entering the cap. STOP.
2) if you still have a lot of clay to extrude. Loosen your jam nut. loosen your handle. Then move the jam nut up a bit then lock it in place then screw the handle on again. Then continue to finish extruding. This way you will not get your Jam nut stuck and you will still be able to extrude your full cylinder of clay.

I am a firm believer of cleaning after each color or extrusion. I do it after each use. Only takes a second if you have the LC cleaning brush. If you don't you need one. It is NOT a bottle brush it fits the tool perfectly take about two swipes your tool is clean and ready to extrude in seconds.
To purchase : http://www.artfire.com/ext/shop/product_view/7674564
Now with all new purchases the Czextruders come with the cleaning brush and the new LC lubricant that I recommend highly. It truly makes for a much smoother extruding. Love the product.
To purchase the LC Lubricant : http://www.artfire.com/ext/shop/product_view/8168080

I use my Lc cleaning brush on all the tools even the LCDisks. Why. This way there is no moisture build up. I brush off the clay over a garbage can or a scrap clay box and its clean. No mess. I ALWAYS clean the plunger after every use. The Czextruder has a lot of force behind it and clay can get in the O rings. Want your Czextruder to extrude faster? When you extrude the clay out, continue on and extrude out the plunger. Couple swipes with the Lc Cleaning brush its clean.
Two swipes or less with the cleaning brush in the main cylinder of the Czextruder and pop the plunger back near the top by the handle and put your handle and cap back on and your ready to extrude some more.

You can see above. Left side is with clay. Right top photo is one swipe with the brush. So easy and only a few seconds of your time.
Making our heart cane. You may have seen this on Lucy's page she is amazing. Just adding photos in case you have not seen it. Here is the link to her amazing Blog. She is so bright and lovely. She inspires me to do so much more than I already do.

Lets make the Lucy Clay Heart Cane.
You will need the Red #4 LCDisk
The heart and the half outside heart
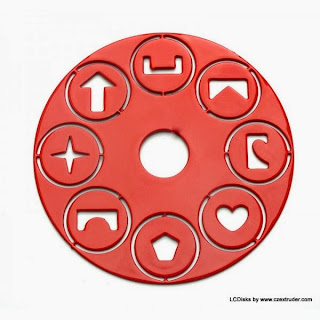
Love this disk. So much fun.
We already Extruded our canes above. Lets put them together.

1) You have your inside. I slice both ends with my LC blade so they are straight and do the same with both ends of the Black outside heart. You don't want to work with wonky ends.
2) Taking one side of the Black extruded half heart you put the purple extruded heart in the Black half heart. You will love how they fit together perfectly. Slowly put them together fitting the inside part in nicely so that the little top of the Black outside heart fits perfect in the grove of the inside part of the purple heart on top. This way you get a nice clean cane.
3) then put the second Black outside on. Trying carefully to match the top together. Its ok to adjust the clay as you will not adhere it permanent until you have both sides of the black on.

1) Once you have both sides on and you pull the Black clay together securely then take your acrylic roller and lightly on each side cover the seams. I do all four sides to get rid of any air bubbles and this secures the heart together evenly on all sides making for a cleaner cutting cane.
2) I set mine aside for a half hour in the fridge.
The Veneer for the Bottle.
At the time I made this tutorial I did not have my LC Slicer but I do now and use if to cut these canes all the time. It is the best slicer on the market. Love it and it cuts wonderful. The blade is sharp on one side. VERY SHARP. And flat on the other side. Making a clean precise slice every time.
To purchase the LC Blades or Slicer see them on my Artfire.

1) On your pasta machine Make condition a 1/2 of a 1/4 2oz pkg of Premo black clay.
2) on my atlas I ran it through on a 3.
3) Condition just a bit more of Premo White Transparent on a 3 on my Atlas pasta machine.
4) Lay them as shown in the top left corner and roll lightly together with an acrylic roller. The two sheets together are about 4 inches across the bottom and 4.5 to 5 inches to the top.
5) prepare your bottle. Carefully using wire cutters cut the aluminum cap off of your bottle. I used insulin bottles that clay artist Jean Daniels donated to me. Insulin bottles work great for bottles of hope and many other fun projects. I cut the aluminum off and throw away. The aluminum is very shape so discard it in something in the garbage that will protect your hands in case you push down on your garbage when you pack it. You could cut yourself. Sorry I am a mom I worry.
6) save the rubber stopper. You CAN bake this for the top. I have many times and they work great.

If your wondering WHY put part transparent??? Well In my initial extrusion in the purple I used a lot of transparent and if you shine the light through it or put a little bulb in there it lights up :). This can be used with tea lights or any glass.
1) I cut my Heart Cane into 6 equal sections. With this type of heart It will be different with every slice. So I just matched it up how I liked it.
2) I sliced a thin layer of the 6 hearts approx. 2 mm with my LC Blade. Then started at the bottom of the veneer and laid it from left to right and lightly placed the layer on the bottom.
3) I continued to do so until I covered all but 1 inch from the top because I wanted a black top on part of it. You can go all the way to the top. But with this one there will be extra and no need to waste your pretty cane.
4) With your acrylic roller. Lightly roll the Veneer to connect all the layers. It wont take much and you want to slowly do this with light pressure so you do not distort your canes. I always roll from top to bottom, then bottom to top. Then side to side and it usually is enough. I do not do one way more than once. I do it opposite ways. This seems to keep it from distorting.
5) Using your LC blade slice under the veneer (love this blade for that) never any clay waste underneath.

1) You do not have to put anything on your bottle. Unless you want to then you can add Liquid clay that is transparent or Sculpey Bake and Bond. I did not need it for mine as it is tight around the top so it will not come off.
2) I measured the exact measurements of the bottle before making my veneer with a scrap piece of clay. Making for a perfect fit.
3) Make sure your clay veneer is going straight up and down. Bring the clay around without stretching it (unless you need to) Then put both ends together. I like this cane for this project because they hearts fit together perfect because its square.
4) a couple light rolls with the acrylic roller along the seam and it looks great.
5) using both thumbs and pointer fingers on each side of the neck of the bottle I pinched the clay together. Gathering it like you would ribbon or lace. It immediately goes together nicely. Do NOT twist or turn it. Just lightly bring it together at the neck.
6) you can see in the last photo where the seem is open. that is fine. You are going to cut some of the excess off. Or if you want you can flatten with your fingers and make ruffles.

1) Using the LC Blade I cut off about 1/2 inch of the black excess clay. I left some on to use for a base for the inside of the flaps.
2) In the top right photos you can see me pushing all ends together to make sure there is a smooth seem all around with no gaps. Making it ruffle.
3) With this one I wanted it to look square a bit. So I folded in each corner towards the center of the glass. Careful Not to touch the glass bottle. As you will need it to be clear for the cap. I tucked it in with my fingers so it laid flat.

1) I pinched the corners of each fold and softened the seams with my finger. Making nice folds and flattened it a bit so that the top will fit nicely once made.
Making the top
1) Using the Kato 1 inch square kutter I cut a one inch square of black Premo clay rolled out on the thickest setting of my Atlas Pasta machine. I set the square aside.
2) Using the largest circle Kemper Kutter I cut out a circle the same thickness as the square.
3) Taking the rubber cap from the bottle I pushed down and made an impression in the center of the circle. Not to hard you want it only as big as the cap not larger. I removed the cap and put some glue in the spot where the cap goes. I use Crafters Pick glue. Works great for clay, rubber, glass, metal and you can bake and it dries clear.

1) Put your cap back in the center where the glue is and then used the 1 inch cutter I squared off the circle a bit so it would fit perfect with the top of the bottle.
2) Using some of the extra black and some of the heart cane I made a small 1.5 inch veneer for the top for the cap. And added that to the 1st black square I cut. Rolled it with the acrylic roller so that all air bubbles were gone and it was nicely attached.
3) Using the Yellow #2 lcdisk the round. I extruded some of the left over purple mix. I left it spiraled in the scrap so that it had a pretty ribbon stripped look.
Time to decorate the bottle

1) Using the Kemper Heart Kutter the middle sized one. I cut hearts in all of the colors of purple. Several of each.
2) Then with my needle tool I put two lines in each heart from the bottom of the heart partially half way up the heart, then three little dots in the top of each heart on each side.
3) Top left corner you can see I added just a few hearts as accents one of both colors. Then a 24pp Genuine Swarovski crystal.
4) Around the bottle I continued this design but made 3 petal flowers in each color of purple adding a 24pp Swarovski crystal to the center of each.
5) This is a good way to hide your seam if you have one.
6) Decorating the bottle top. I added a full layer of Purple Sculpey hearts around the whole square. Then in the center of that added Purple Pearl Premo clay hearts around the center of that heart flower. In the center I added a 24ss Genuine Swarovski to the top.
7) Around the bottle I added little Swarovski crystals in different sizes and little hearts here and there for decoration. Optional.

1) Top left slicing the ribbon at two angles with your blade. Then place the ribbon where you like it. You do not have to lay it flat. Let it flow like ribbons do.
2) Upper top right photos. Adding a clay bow to the center. Using similar colors of clay I cut out hearts with the Kemper heart cutter and added the same accents as the others. Two hearts one on each side then in the center made a round ball and put one line in the center to make it look like a bow with my needle tool.
3) the other photos show close up pictures of details of each heart. Click the photos to enlarge for more detail.

Now that your top had time to sit for a minute its time to add the cap to the decorated top. Using your blade lift the small top and then put the cap under it pressing with your one finger on the crystal and one on the cap. This sticks the two parts together nicely. Sign if you wish.
Bake according to your manuf. Directions on your clay. I baked with the top on. You can however bake with it off. If you do and you use the rubber caps I put it in baking powder or on a fiberfill base to protect the rubber top. But have never had any problem.
I bake all my clay at 250 degrees for 45 minutes to an hour.
Optional: Glaze if wanted or needed.
Here are a few bottles of hope I made with the heart canes. Both are different canes but similar techniques. I hope you enjoyed the tutorial, if you have any questions leave a comment or email me. I hope you subscribe and follow along on my blog. I will be posting many new tutorials with these tools and many designs of my own that I have been working on.
Please take a few moments to learn about this amazing charity, it is a wonderful cause for those that are having a difficult time and they all truly love our creations. If you don't know where to donate your bottles to contact me and I will happily arrange that for you.
To find out more about the Bottles of Hope Charity
Go to this link:


To Purchase the Lucy Clay Tools in the Usa please visit my shop

To find a distributor in your country
click the Lucy Clay tools photo below

We at the Lucy Clay Tools Family Thank you for your support of these new wonderful tools and for welcoming them all around the world.


Thank you for visiting my blog. Come back by for more free tutorials this week and many weeks to come. I have lots to share and If you want to see something with one of the tools please comment. I will be making videos and more tutorials and I am always happy to help with requests. Comment below and I would love for you to share.
Hugs and Happy Claying

Create with Heart, Love, Color and Bling

Please come follow us on Facebook.
Any questions or concerns please ask or email me at
