
CHROME
Who doesn't love a shiny new tool. When I opened up my new slicer and saw the Chrome accents I was thrilled. I have a thing for Chrome. I think it looks so sleek and professional. I have always been a Chrome girl for my vehicles and appliances. I think they look so professional.
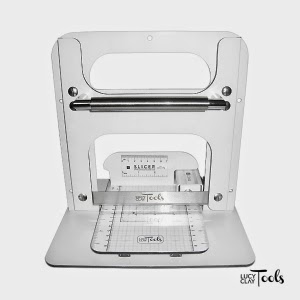
Above is the new Lc Slicer in Chrome.
Good news it is on sale in my shop in the USA only. I only have 8 left. I sold the rest already. I had a small amount I could buy at that price. So don't miss out the sale is only until 7/11/2014 for the price of the first version $265 instead of $295.
Click the slicer photo above or click the My Artfire to take you to the listing

What is the Difference many have asked?
1: The handle is chrome

and the EASE is White

2: The placement of the handle is in front instead of on top.

3: As with the first version LC Slicer, the handle moves smoothly when you push down on it and slices easily through any kind of clay you put there. I like the position of the chrome one because I tend to sit a lot when claying and its really easy to use the front handle. If your slicing canes I tend to like to stand. Its a personal preference really.


4: the prior versions are a bit different as they are pushed from the top so the are all amazing to slice with. It just depends on how you like to slice while working. I have found after practice. I really like the Chrome upgrade.


5: Smooth, Thin, and exact slices using the Ease and or just using the measurement grid on the base. That has to be done by eying it but after awhile you get used to doing that. The Ease is more precise and after a few tries you figure out how many turns of the back black knob how many turns it takes to cut the slice thickness you want or need for your project. I like to write down my favorite slice numbers.. I have tiny little hands so the placement of the handle on front works well. The LC Slicer works amazing for Veeners, Billet Slicing Technique which I have been experimenting with lately(more to come soon), and Cane slicing of any size or shape. I just finished a magazing project and the canes were the smallest triange on the extruder LCDisk. I thought it would be hard but I lined them up in a row and cut ten triangles at a time. What an amazing tool to have on your clay table. Saves time and with the protective cover I sell in my shop also saves your workspace from cut marks.


Interested in this cane. Its gorgeous. I love this amazing cane tutorial by ClaybyKerm
Find the tutorial here. Tell him I sent you. Save more
Its called "The Flower of Insanity" Tutorial
BLADE ASSEMBLY
6: The new blade upgrade that is screwed in is great, It is a new upgrade in the last month and you can purchase this upgrade here: LC SLICER BLADE UPGRADE LINK available in my
artfire shop


To buy or upgrade your slicer to the new blade:
http://www.artfire.com/ext/shop/product_view/9304595
LINK TO BLADE REPLACEMENT GUIDE
http://www.lucyclayslicer.com/guides-reviews/110-videos/189-blade-replacement-guide
LINK TO BLADE REPLACEMENT GUIDE
http://www.lucyclayslicer.com/guides-reviews/110-videos/189-blade-replacement-guide


7: Wanted to share a tip for removing the plastic cover that comes on the white frame of all slicers. It is very easy to remove. I have asked the owner to now remove most of the protective cover because i had some un-assembling their slicer from top to bottom. That makes for alot of work for me.
a: You do NOT need to remove all screws to take it off, only loosen the screw.
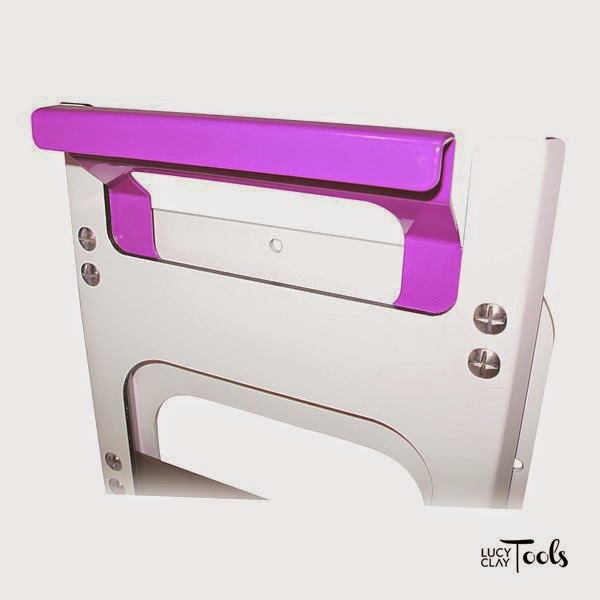
b: I suggest taking loosen one screw at a time. Then take a X-acto knife or scissors and cut around the plastic to remove it. It is very easy to remove. Then screw the screw back in place. Move onto the next screw that has plastic coating around it. If you have a problem getting a screw to attach or somehow unscrew it...use this guide.. It is sometimes difficult so it is important to NOT remove screws. You should not take your slicer apart for any reason. (the screw will not lock-there is a square bit it needs to lock into that floats in the rails between the slicer handle) see this photo. Put the square bolt in place and it will screw will then screw into it perfectly. BUT PLEASE DO NOT TRY THIS AT HOME.

c: Or you can take a very sharp Xacto knife and around each screw softly cut the plastic coating off and it comes off very easily.
d: Before you use your slicer. It has traveled a long way there is a large round Washer in your slicer parts bag that is your wrench for the screws. Use that to hand tighten all of the screws on the front in case you loosened them while removing the cover or they were loosened in transit.
a: You do NOT need to remove all screws to take it off, only loosen the screw.
b: I suggest taking loosen one screw at a time. Then take a X-acto knife or scissors and cut around the plastic to remove it. It is very easy to remove. Then screw the screw back in place. Move onto the next screw that has plastic coating around it. If you have a problem getting a screw to attach or somehow unscrew it...use this guide.. It is sometimes difficult so it is important to NOT remove screws. You should not take your slicer apart for any reason. (the screw will not lock-there is a square bit it needs to lock into that floats in the rails between the slicer handle) see this photo. Put the square bolt in place and it will screw will then screw into it perfectly. BUT PLEASE DO NOT TRY THIS AT HOME.
c: Or you can take a very sharp Xacto knife and around each screw softly cut the plastic coating off and it comes off very easily.
d: Before you use your slicer. It has traveled a long way there is a large round Washer in your slicer parts bag that is your wrench for the screws. Use that to hand tighten all of the screws on the front in case you loosened them while removing the cover or they were loosened in transit.

Safety Features on LC Slicers that I like
The white Plastic cover that you can put on your slicer during travel or in between projects. I store mine in my extruder box when not in use. That way I do not loose it. The blade is VERY sharp so use caution when putting the cover on.

When I put it on I pull the two edges of the plastic sides apart so that there is a space, if you don't then the blade will slice the plastic cover. This way your blade fits easily and without cutting into the cover to protect your fingers and little ones hands. Or if you live in my house, hubbys fingers, he has now realized that this is a Bad A-s tool that will cut through anything even his tough skin ;).

Safety Feature #2
Locking Mecanism
This can be used or not used. It is up to you. But I truly recommend it. Even just screwing it in place but only part way so it is there if needed. It is the red knob on the back.


This is a TIP for prior slicer buyers only.
If you are just getting your slicer. It is best to put the lubricant on your ease before assembling your slicer. It is safer. It is SAFER to take off the frame and then put on the lubricant. Please remove the frame . 4 bolts , 4 wing nuts, set the frame aside and then put the lubricant on the threaded rod of the ease. So do not look at my frame, I am a bad example.
I do not recommend putting the lubricant on with the frame attached.
Please remove your frame first..
NEW TIP FOR BETTER SLICER AND EASE USE
TAKES JUST A FEW MOMENTS AND YOUR EASE WILL GLIDE AND SLICES WILL BE FASTER AND EASIER. MOST IMPORTANTLY, THIN AND PERFECT SLICES.

FIRST. LOCK THE BLADE

Second Use ONLY LC Lubricant. Any other lubricant used on LC tools voids your warranty.

Third. If your Ease was already assembled. Do not remove the whole Ease.

Fourth. You only need to remove the front hex bolt and washer.

Fifth. Put your parts aside but do not loose them. Remove the threaded rod and handle part.

Sixth. Put a small amount of Lc Lubricant ONLY on the threaded part of the handle. Only on the threads.

Seventh. I like to run my finger with the lc lubricant up and down the thread several times to be sure its on there well.


Eighth. Once the lc lubricant is on there well. Then just like the first assembly. Put the threaded rod and and handle in the ease and thread into place. You will find it is a bit different because the base is screwed down. Put one hand in front of the sliding base holding it in place. This makes it screw on much easier and smoother.

warning.. do not put your fingers in here. you can get cut..
Ninth. Place the Washer on the thread. Then place the Rounded Hex bit in place. You now have a smooth running Ease. I think you will love this new tip. It really has improved the ease slicing for me.
Warning
Remember do not do any of the above with the frame attached you can get cut. Remove the frame then put the lubricant on your thread of your Ease. It makes it much easier, faster and safer for you and your claying fingers. Thank you.
Some helpful videos for the slicer
How to open the slicer box and assemble.
Follow this link:


How to add the sticker grid to the movable base.


How to assemble and use the Ease


Please subscribe to Lucy Clay Tools YouTube Videos for more videos and updates that will be posted often.

I do not have many and mine are outdated and I had pneumonia while making my videos so I apologize by subscribe to my Youtube channel I have a video camera on the way and I cant wait to get started I have a list of videos that you have asked me to make and I want to start soon.

Amazing blog and Tutorials for the LC tools and Amazing designs by Lucy join and follow this blog:
Here you will learn so much you can create with you extruder and be inspired to get your clay and tools out and create everyday. She is truly an inspiration to so many.

Meet Lucy @ https://www.facebook.com/Atelier.Lucy

Lucy is also having a ring challenge so be sure to watch for inspiration and fun.


COMING SOON
New waves of fun blades.

They will be in the USA mid August. I will have a pre-order soon. Waiting to find out the exact names and prices so I can list them for you. I am excited to create with them. I promise to share as soon as I know and have all your names written down to notify you.

Looking for any of the Lucy Clay Tools?
I have the Czextruders
on sale
until 7/11 $10 off normal price


