

Free Polymer Clay Ghost Earrings

This Tutorial Is free for your enjoyment.
Happy Halloween 2012

Created and Designed by me
Kimberly Idalski
Kimi's Jewelry & Gifts

Supplies & Tools

Supplies & Tools
Sculpey 5 in 1 tool
Sculpey Etch and Pearl
Sculpey Style & Detail Tools (Set of 3)
Sculpey Glow in the Dark Clay # 1113
Premo Black Clay #5042
I ended up not using the white Premo clay
Clay Blade ( I prefer flexible blades)
Optional (beads & silver links)
Optional (eye pins, bail, crystals)
Rubber Gloves
Baby Powder ( I use baking soda baby powder)


Cut two small 1/8 size slices of black clay

Using the largest Sculpey Sculpt Tool with the Silver ball
at the end and make the black balls
approximately the same size.

Make the two balls and put them on a bead pin.
Put them on your bead baking rack.
Bake as directed on the clay you are using.
If using the Black Premo like I did
275 degrees for 30 minutes.
Set them aside to cool.

Cut 1/2 of a 1/4 of a block of Glow in the dark clay

Flatten out the clay to a 1/4 inch square
Cut in half equally to make two small rectangles

Roll the Glow in the Dark clay into balls.
They should be slightly larger than the black beads.

Sprinkle powder onto the larges ball tool so the clay does not
stick when molding the ghost

Put the ball of glow in the dark clay onto the ball tool
Start to push the ball directly into the center of the clay.

Once the ball is inserted until there is about 1/4 inch of
Clay at the top then start to mold the clay around the ball tool.
Do not stretch the clay slowly mold it and form it.

Using you thumb and index finger slightly press the clay
around the ball tool to shape it like a ghost
You don't want to press to hard you want it to stay
about 1/4 inch thick around the ball tool.

Keep shaping until you get a nice ghost like shape

Once you like your shape its time to mark the eyes.

Using the largest Etch N Pearl tool
Optional (use a straw or any circle shape if you don't have this tool)

Make two holes for the eyes. Do NOT push all the way
through were just making a shape so we know how to
shape the ghost later.

Now remove the ghost from the tool.
Lightly with your fingers pull the ghost off.
It should not stick. Do not pull hard lightly and slowly
remove it from the tool.

Your ghost will not be perfect at this point
We will reshape it shortly.
Just showing you the shapes Again. Size Variation In Black Baked Bead,
Clay Ghost Ball & Tool


Using one of the black clay beads on the pin
Prepare your ghost to be put on the pin around the bead.

Insert the black bead into the open area of the ghost bead
Where the tool was earlier. It should fit perfectly.
Mold it around the black bead like you did the tool.

Now you have your black clay bead inside the ghost.
(optional- you can leave the ghost empty- I added the
black bead so you would see eyes when it glows)

Now we want to shape the bottom of the ghost.
Using your thumb and index finger lightly pinch and pull
to shape the bottom how you like it.
I made mine so that it has a small ruffle look.
(optional~ you can make a very flowing sheet, add ruffles and bends)

Continue to shape all around both Ghost Beads

Now to Re - Make the eyes

Just like we did earlier, Use the Etch tool to reshape eyes.
Push all the way to the black bead this time.

Once your ghost bead is shaped how you like.
Using the other end of the Etch N Pearl tool clean out
the eyes and shape the inside how you like
smooth around the inside of the hole so that no clay
pieces are left inside it.

In this photo my eyes needed some more fixing.
I used the round end of a paint brush and cleaned up the
circle to make it all smooth.
You may choose to leave it scratched to look more spooky.

Now last step is to clean up any particles of dust off the clay.
I use my blade and slice thin layers off where it is
showing dirty or fuzz. If you don't have any that's great.
If you do slice very thin layers off and smooth with your
fingers to make the ghost into the shape you like.
Smoothing with your thumb leave less fingerprints.

To get most of the fingerprints and smooth out the ghost
Roll the ghost on your clean work area until smooth
This will also make it cling more to the bead inside.

Keep rolling until your happy with the shape and texture.

Once your done you can add a little eye last with the
5 in 1 tool sharp blade by making two small dashes.
I also made little dents at the bottom of the ghost
to make it more defined with the 5 in 1 tool.

Repeat all the above steps and make a second Ghost for your Earring Set.
I made three, The third one larger for a Pendant

To Make the earrings I used
2 pieces of 3 inches 20 gauge silver wire
2 jet bicone 6mm swarovski beads
2 jet bicone 4mm swarovski beads
2 silver earwires

String on the Ghost first then the Bicones,
Once you have the beads on in the way you like then add the earwires.
I wrapped the earwires three times with the wire to make a nice finished look.

This is our finished earrings. They Glow In The Dark wonderfully. So cool!
I like bling and wanted to add more.
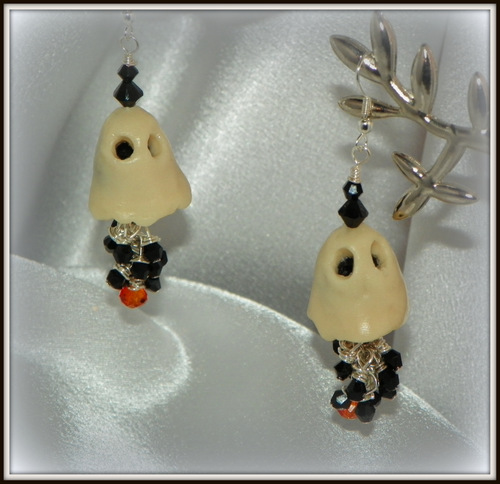
I used 3 small chain links and attached it to the circle hook I left under the ghost bead
14 Jet 4mm bicones & 1 - 6x4 Rondelle Orange Swarovski Crystal for the dangle stones
I wire wrapped each stone with a small little circle opening so I could add them to the chain.
I added the orange and two black to the bottom link
3 black Jet on each side of the second link
3 jet on each side of the third top link to make it full.
(in total for each ghost 14 Jet 4mm 1 Orange bead)

For the Pendant I made two strands of the dangle.
Also added one extra chain link for more length and added three black to each side.

I tried so hard to photograph it to get the glow in the dark.
This one turned out the best.
My house has some sort of light on always so it was hard.
They turned out really cute.

Enjoy and have fun. I would love to see your ghosts.
Post a link on the comments to show me yours and Ill be sure to promote for you.
Thank you for stopping by and supporting me and
handcrafted artisans

Need Help? Or have any questions
email me or put your quesitons in the comment section.
Ill help anyway I can.

To find these and other Halloween creations for sale see my Etsy and Artfire sites.
They will all be listed today

