
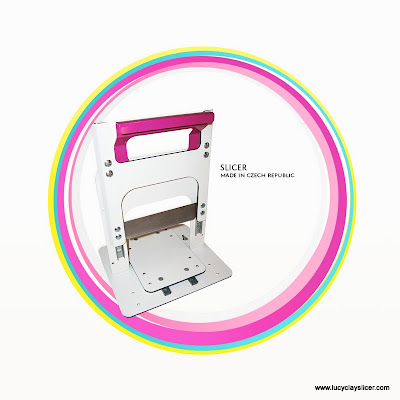
Lucy Clay Slicer

To my Artfire shop in the USA.
Pre-Order In Mid November 2013
They are being made now and available very soon

The first Lucy Clay Slicer arrived in the USA on 10/30/2013 I was so honored to be the first to be able to view, touch and experiment with this amazing tool.
My initial reaction ?
WOW, GASP, SIGH, FAINT
Love it. Sturdy, Beautiful, Slices like a Dream. Truly the most beautiful professional tool I own and have ever seen. Other huge slicers are gaudy and you can see all the inside workings. This is all covered with strong metal plates and painted to look clean and professional.
I cant give away trade secrets but this is a slicing machine, made and engineered to cut clay canes, large - small - tall - thick. Its quality just like all the tools at Lucy Clay Tools.
This company amazes me more and more with each shipment.
You can tell when they make something they put their heart into making sure it is the best, it looks the best and works the best. Not just a tool. I dream slicer.
See my video here:
https://www.youtube.com/watch?v=q1M3wNzpwO8
See my video here:
https://www.youtube.com/watch?v=q1M3wNzpwO8

Lucy Clay Slicer Colors Information Prices and Availability for pre-order soon in the USA in my shop.

Magenta ~ Lucy Clay Slicer

Pink ~ Lucy Clay Slicer
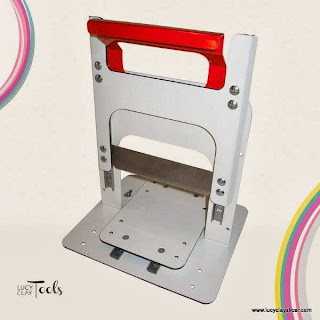
Red ~ Lucy Clay Slicer

Teal ~ Lucy Clay Slicer
*******
The first pre-orders will arrive Mid November or sooner and then I will post the pre-order for the next batch. The first pre-order sold out fast so order yours soon or email me to be on the list to notify when they are available for pre order at Kimisdesigns@yahoo.com
My Review of the Lucy Clay Slicer
1: Initially I see the box. Very pretty new label and visually appealing.
2: Open the box like that it is a re-sealable, re-usable box if you need to take it apart and put it back in there for traveling to clay retreats or classes it is easily done.
3: Easy to assemble even without directions. I did it in just a few minutes.
4: Directions are being made by myself and the company and will be included with each slicer sold.
5: It has protective stickers on the white metal that are easily peeled off (take the bolts out first and then you can remove it in one peel).
6: Once together I stood back and smiled. Pretty, sturdy and Very amazing tool. I was really pleased at the durability and quality of the whole piece.
7: Love that the tray moves back and forth my hand instead of having to crank an handle or anything. Easy to use without knobs and a bunch of messing around.
8: The sliding base is not cut proof so I experimented. To be sure I didn't mess it up I put a ceramic tile on it. Then later cut a see through cutting mat for mine. I will share this in the next blog and also will help anyone make one if they want as it will have measurements to cut under it. Fun project. I like making things work my own way. Not something set in stone I like to be able to make some decisions on how my tools works. I like having the option to put different types of materials down for cutting depending on my project type.
9: I cut up lots of things. First I made a fun private video for those that like Halloween and the guillotine aspect of the slicer. I made a body and had fun with the slicer.
10: then I cut up a Stroppel cane that I had made just an hour before opening. With a stroppel cane your black is fresh the other is some old some new and some who knows. That cut like a dream and it was fresh clay and old clay mixed.
11: then I cut up a two years plush old large rectangle of scrap. I had to beat the scrap with a hammer to get it into the shape. It cut like butter and held its shape. Every kind of clay you can imagine and scrap canes that were old and dry and scrap work half baked. A messy cane and it made cool cuts of clay.
12: Then I cut a kaleidoscope cane and Loved that it did not distort the image on any part of the cane even at the thinnest slice which was less than 2mm. All done on video for verification.
13 : I have since used it on really fresh clay and canes and it cuts very well without distorting my canes at all. I will be posting many videos and step by step photos and tutorials of the cutting process over the next week. I have lots of ideas and projects I am experimenting on with the tools and the slicer together.
14: My overall feeling about this tool. WOW. I love it. I love that it fits on my stand that I keep my pasta machine and Lucy Clay vise on that I take with me to retreats and classes and move from room to room to where ever I am creating. So I have all my tools and necessary things in one small spot. So its Large but not to large. Its very cool looking. I like pretty things. Strong, sturdy, easy to assemble, easy to use. The blades are razor sharp. It is an amazing professional quality tool. I am thrilled to have it in my studio.

Please view my Youtube Video on the first peek at the slicer and cutting up the canes I mentioned above. See it in action and more videos coming soon.
This week is experiment week. I will be doing more videos to show thick, thin, how big can you slice, lots of fun things. So be sure to subscribe to my youtube and also my blog so you are the first to know about all the new tools and any updates on sales.

Lucy Clay Slicer Box

Just some information about the slicer.
The base part and front cover are made from a product called DIBOND which has a hard plastic core and aluminum plates - layers on top and bottom. This is very sturdy material it feels like steel but is very lightweight.
The handle and the frame of LC Slicer is a painted metal plate. These two main parts are connected by 4 screws so you can very simply and quickly disassembled the slicer..
The handle and the frame of LC Slicer is a painted metal plate. These two main parts are connected by 4 screws so you can very simply and quickly disassembled the slicer..
Size: 25cm x 22cm x 25/35cm (when down/up)
Weight: 1,7kg
Cutting window size: 12cm x 10cm
Blade length: 16cm
Packaging carton box size: 26cm x 26cm x 8cm


Your LC Slicer comes in a re-useable box and can be disassembled for travel or shipping. So save your box.

When opening the box don't cut into it, It has folds and flaps that close it back up for storage.
Foam inserts for protection while shipped and for storage when traveling.

Remove the top foam insert and set aside. Do NOT stick your hand in the box yet. Look before putting your hands in there, You will see where the blade is already placed where it belongs on the bottom of the handle. It should have a round Black foam over it. I keep it on my blade when not in use.
The Slicer is in two parts only. So it is easy to assemble. Directions by me and the company are being prepared now and will come with the Slicer.


Your base has a second move able sliding section this goes under the blade itself to adjust and move your clay without having to put your fingers under the blade. Just lightly push this base from the front or back to move your clay where You would like to cut it. I like that it easily moves back and forth so you can adjust as needed. While moving the base Put your hand on the top and keep the blade up so not to scrape the move able platform.


I bought these Everbilt stickers at Home Depot in the cabinet handle section where you can buy cabinet bumpers that is what these are. The prevent the trays or cutting mat from sliding while on the Slicer.


I experimented and put a ceramic tile I had as I like to sometimes cut on tile. Put rubber stoppers on the bottom of the tile then placed my ceramic tile on the move able base. This worked well.

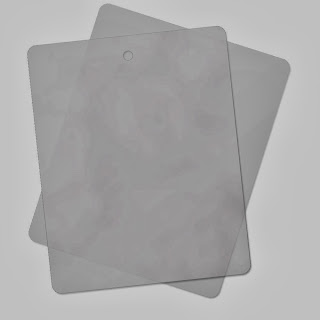

You can see on the slicer that there is a see through mat now. To purchase the mats that Lindly recommended for clay this is where I found them on Amazon http://www.amazon.com/gp/product/B00BNJRXRA/ref=oh_details_o00_s00_i00?ie=UTF8&psc=1
I then later experimented and cut a matching size and shape see through plastic cutting mat cover. Lindly Hauani on the Polymer Clay Tutorials page on Facebook recommended these mats from Amazon. Here is the link to purchase. They work great for any workspace where you will be using a blade or sharp tools and want to protect it.
I liked the idea of using this because then I added a printed out measurement guide for under the cutting mat. This way I can cut any size slices I want without a thick ruler or measuring. I like this option. It is not needed but was easy to do and I like to experiment and make tools work for me. As all of us do things differently I liked having the option to add this to the underneath so I can see the numbers not use a dial or have to think about moving knobs. I liked the simple option of looking at a line and number and cutting which is how I do things now when cutting on a small scale. I always have a ruler out.
I also have on the way a see thru cutting board that is being cut 7.5 inches by 5.5 inches for me to add to the sliding base :). I like to have options. I also ordered one in the exact size to cover my whole portable tool desk. Will share once I see how they turned out.

Thank you for stopping by. Tommorow I am posting a free tutorial be sure to join my blog and be the first to know about new items.


Create with Heart, Love, Color and Bling